
WordPress website maintenance packages by a WordPress developer based in Perth providing WordPress help & support in Australia.
Welcome to Webby, where we provide comprehensive WordPress help, support, and maintenance services throughout Australia. With over 16 years of experience in supporting and developing WordPress websites, our team of experts specializes in keeping your website fast, secure, and up-to-date.You can choose a WordPress maintenance package below.
Hire our Webby WordPress experts with 16 years of experience providing WordPress support and development in Australia. In each monthly WordPress website maintenance package is a WordPress expert who provides:
Speed and performance optimization
The performance of your websites starts degrading after one or two years after launch as new updates and techniques are released every few days. Optimizing is the key factor to attract more users and get your users a seamless online experience with a smooth and stable website!
WordPress site maintenance service
Our regular WordPress maintenance service help you increase security, install extensions, and make necessary WordPress core updates, WordPress theme and WordPress plugin updates for your website. This will keep your site up to date with the latest software and malware checks provided.
WordPress security, malware removal and scans
Stealing credit cards or other valuable information from your site can harm your valuable business reputation. Our website support services can help you secure your website and build trust with your customers.
Live chat, phone & email support
Our developers will always be available for handling your website issues and provide you with the best solutions and, yes, we pick up the phone!
Website backups and security monitoring
Security and backup procedures are often neglected but are equally essential. Our Backup Security service provides you with daily backups and weekly backups of your website and in case you need it to restore from a particular date, we are just a phone call away.
Technical consulting
This is the main feature of our WP support services. We will make sure there are no major or minor bugs that can affect the proper functioning of your website which in turn would reduce the number of website crashes and decreases cart abandonment. This support can also include making modifications to the appearance of the website.
Online training
As a website owner, you need to know about the proper guidelines to follow to keep your website running smoothly. Within our WP maintenance services, we will train you so that you can handle the day to day workings of your website and so you can also make minor updates yourself like updating images, adding new products, changing product pricing etc.
Code review
We offer you a systematic examination of code to help you fix the mistakes that were overlooked in the initial development phase. It will improve the overall quality of your website.
Digital analytics
Understand how your website is performing with Google Analytics 4 setup, including conversion tracking using Google Tag Manager Google Analytics 4, triggers, events and tags.
Search engine optimisation
Get set up properly in Google Search Console to understand your Google search traffic. Add your website sitemap to Google Search Console.
Mailchimp setup & integration
Add lead magnets, call to actions, email service provider sign up forms (e.g. Mailchimp), segment your Mailchimp audience, add custom Mailchimp email templates for each segment.
Digital marketing & landing pages
Add a custom landing page to your website to send your Google Ads clicks to. Measure Google Ads conversions and A/B test your landing pages to optimise Google Ads ROI.
WordPress support service
Problems can happen with WordPress. You might see a white screen of death or an error message on the public website or private dashboard. Contact me for help.
Managed WordPress hosting
Webby can talk to you about a website hosting plan that is optimized to make your WordPress site run lightning-fast and can also serve your consumer base.
Search engine optimisation
Configuration of smart WordPress SEO tools, integration of your website with Google Search Console, on-page SEO optimisation.
WordPress web design
Your website design might benefit from a fresh clean new look, or even some refinements and improvements to the existing design.
Found an issue you need fixed? Here's how our support system works
Step 1
Send an email explaining your problem. Use a video if it helps.
Step 2
A support ticket gets created and an alert goes out to our entire team.
Step 3
The first developer that’s available will start fixing your issue within a few hours for non-emergencies and within minutes for urgent requests.
Step 4
We report back to you once the problem has been fixed.
Skilled at handling every kind of support request
- Page changes: your links are broken or you need to update them
- User experience: outdated plugins are affecting the look & performance of your website
- Search problem: your site has been delisted from search engines
- Admin issue: you’re not able to access your website admin area
- Attacks: hackers are attempting to access your website
Our combined expertise means we can solve any problem
- Australia-based with 14+ years in business
- All are veteran custom programmers

Monthly Development
WordPress development services- 5 hours of developer time
- 3 months rollover for un-used hours
- WordPress maintenance & patches
- Website speed optimisation
- Site monitoring
- Website security scans
- Free website recovery for hacked websites
- Encrypted offsite backups
- 3rd-party support liaison
Monthly Maintenance
WordPress maintenance services- WordPress maintenance & patches
- Website site speed optimisation
- Website security scans
- Encrypted offsite backups
- 3rd party support liaison
Monthly Updates
WordPress maintenance services- WordPress maintenance & patches
- Website site speed optimisation
- Website security scans
- Encrypted offsite backups
- 3rd party support liaison
- 1 hour of Webpage edits, Blog post publishing
Emergency Services
Fix emergency WordPress issues- Recover from broken websites
- Recover from website errors
- Recover from hacked websites
- Recover your website access
- Website security scan & virus removal
- 3rd party support liaison
Questions?
If have any questions, please fill out the form below:
Have a lot of work? Have concerns about your website?
Think you might need more help than just 5 hours of developer time each month? Or do you have concerns about your site’s overall health?
We offer an audit that can help you identify what changes to your site would be most helpful while giving it an overall check up.


Steve looks after all my website maintenance, updates and answers all the many questions I have!
He is extremely efficient, easy to deal with and nothing is too much trouble. He keeps me in the loop when he has to investigate an issue or problem I may be having.
I would recommend Steve to anyone who needs assistance with their website.
Steve manages our website and when he made changes to it to make it more accessible for everyone out there our work exploded.
We are more than happy.
Steve rebuilt our website and did a great job. Did everything we requested and took all my demands with absolute professionalism.
Steve has been amazing! He helped us develop our site and has been fantastic to work with. We will definitely be using him for all of our web development and support.
How to maintain and safely apply software updates for your website.
This is the most comprehensive guide to maintaining your WordPress website online.
In this new guide, you’ll learn how to keep your core, themes, and plugins up to date without breaking your site.
Chapter 1: your website’s web hosting control panel
We start with your web hosting control panel first because it is the easiest way to make a backup of your website before making any changes to your WordPress website.
Your website lives on a web server controlled by a web hosting company.
Your web hosting company will have an account for your website.
This web hosting account might be
- controlled by the web designer who built your website for you,
- your web designer may have handed you your web hosting account details to you,
- or you may not know who owns your web hosting account, which is a serious concern, and you should start investigating the trail back to when your website was built.
- If you do have your web hosting account details you’re sweet.
- If you don’t have them, and you want to take control of your website maintenance to save paying money to your web designer/developer, ask them for the account details.
- If you can’t track down the web hosting account details, see if you can follow the invoice trail.
- If you can’t get hold of your web hosting account details at all, skip to Chapter 3.
Your web hosting control panel will usually be running one of the following control panel software:
- cPanel (running on a Linux web server)
- Plesk (running on a Windows webserver)
To find out if your website is running cPanel, go to your website’s address bar, and then edit the address to add /cpanel on the end, e.g. www.example.com/cpanel where www.example.com is your website home page.
If this address loads a login page, sweet, you know your website control panel is cPanel.
To find out if your website is running Plesk, go to https://www.example.com:8443 where www.example.com is your website’s home page. If that loads a login page, you know your website control panel is Plesk.
Chapter 2: making a backup
Once you know your website hosting control panel, login to it.
To create a full backup of your web site by using cPanel, follow these steps:
- In the FILES section of the cPanel home screen, click Backup:
- Under Full Backup, click Download a Full Account Backup.
- Under Generate a Full Backup, in the Backup Destination list box, select where you want to save the backup file.
- You can save the backup file in your home directory, or you can transfer the backup file to another site by using FTP or SCP. If you use FTP or SCP, you must type the remote server, remote username, and remote password.
- If you do not want to receive an e-mail message when the backup is complete, click Do not send email notification of backup completion.
- Click Generate Backup. cPanel creates the backup.
- If you have created a full backup of your web site, you can download the backup file.
- In the FILES section of the cPanel home screen, click Backup:
- In the Files section of the cPanel home screen, click Backups.
- Under Full Backup, click Download a Full Account Backup.
- Under Backups Available for Download, click the file that you want to download.
To create a full backup of your web site by using Plesk, follow these steps:
- In the left sidebar, click Websites & Domains:
- In the right sidebar, click Backup Manager.
- On the Backup Manager page, click Back Up.
- Under Backup content, in the Backup section, select what you want to include in the backup.
- In the Type section, select whether you want a full backup or incremental backup.
- If you’ve never backed up before, click Full Backup.
- Under Backup settings, customize the backup settings
- Click OK. Plesk starts the backup immediately.
Plesk scheduled backups.
The previous procedure demonstrates how to run an immediate backup. You can also schedule backups to run at predefined intervals in the future. To do this, follow these steps:
- Log in to Plesk.
- In the left sidebar, click Websites & Domains:
- Plesk - Sidebar - Websites and Domains
- In the right sidebar, click Backup Manager.
- On the Backup Manager page, click Schedule.
- On the Scheduled Backup Settings page, under Schedule, select when you want the backup to run.
- Select the type of backup, and for how long you want to keep the backup files.
- Under Backup settings, customize the backup settings that you want to use.
- Click OK. Plesk configures the scheduled backup.
Chapter 3: website security using Wordfence
We mention website security first before performing any website maintenance because it ensures there are no bugs or viruses in your website, and the security plugin I’m about to mention will remind you when there are WordPress updates to make, and also warn you if any action is required to further improve your website security, which is very handy.
Without protection, your WordPress website can become vulnerable to being hacked by malicious users. Vulnerabilities exist because WordPress themes or plugins are not well-maintained, and hackers will attempt to login to your dashboard using software which tries all combinations of passwords and usernames.
The solution is to install a well-rounded WordPress plugin called Wordfence.
Wordfence includes a firewall and virus scanner for your website, and prompts you with easy actions to make your website more secure.
To install Wordfence, go to your WordPress dashboard (www.example.com/wp-admin/) where www.example.com is your own domain name, login, and then go to Plugins (in the left hand sidebar) > Add New.
If you don’t see Plugins in the left-hand sidebar, it’s because your user account does not have administration rights. If this is the case, you’ll need to contact the web designer who built your website and ask them for administrator rights.
Once you’ve installed Wordfence;
- Enter your email address where it says “Please tell us where Wordfence should send you security alerts for your website:”
- Decide if you’d like to receive the Wordfence email newsletter, which I recommend.
- Check the terms and conditions checkbox.
- Where it asks to “Enter Premium License Key”, select “No Thanks” to select the Free plan
- Click on Dashboard @ top left of the screen.
- Where it says “Do you want Wordfence to stay up-to-date automatically?”, select “Yes, enable auto-update.”
- Where it says “To make your site as secure as possible, take a moment to optimize the Wordfence Web Application Firewall:”, select “Click here to configure”.
- There should be a button that says “Download .htaccess”. Click this to download the .htaccess file. You’ll need to upload this file through your web hosting control panel if the site breaks during this configuration process. [insert link to how to post]
- Click Continue.
- Hopefully you will see a message that says “Nice work! The firewall is now optimized.”
- If you see a another message follow the prompts. If you have problems, see https://www.wordfence.com/help/firewall/optimizing-the-firewall/
We’ll now need to configure the Firewall to stop thugs from entering our website:
- In the WordPress dashboard, select Wordfence > All Options
- Under Firewall Options > Advanced Firewall Options > Whitelisted IP addresses that bypass all rule, enter your IP address, which you can obtain from http://www.whatismyip.com
- Under Firewall Options > Advanced Firewall Options > Brute Force Protection, the default values are quite gentle to hackers. Better to set them to the following values:
- Lock out after how many login failures: 3
- Lock out after how many forgot password attempts: 3
- Count failures over what time period: 5 minutes
- Amount of time a user is locked out: 2 months
- Check "Immediately lock out invalid usernames"
- Choose Save Changes @ top right
You’re now ready to enjoy the protection of a firewall and virus scanner.
Let’s use the Wordfence Scan for the first time:
- Go to WordPress Dashboard > Wordfence > Scan
- Choose Start New Scan
- Wait 24 hours and return to this page to find the recommended actions.
Chapter 4: responding to WordPress updates
How do I know updates are available?
Login to your WordPress admin section, and look for a number at the top of the screen, highlighted in green below:
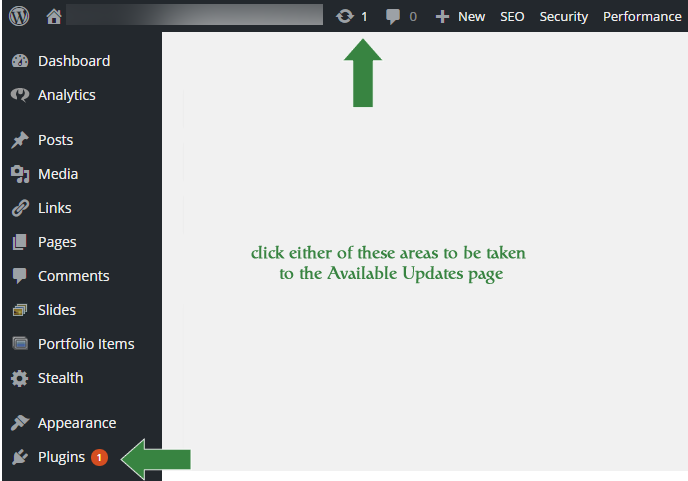
Click either button, to be taken to the WordPress Updates page
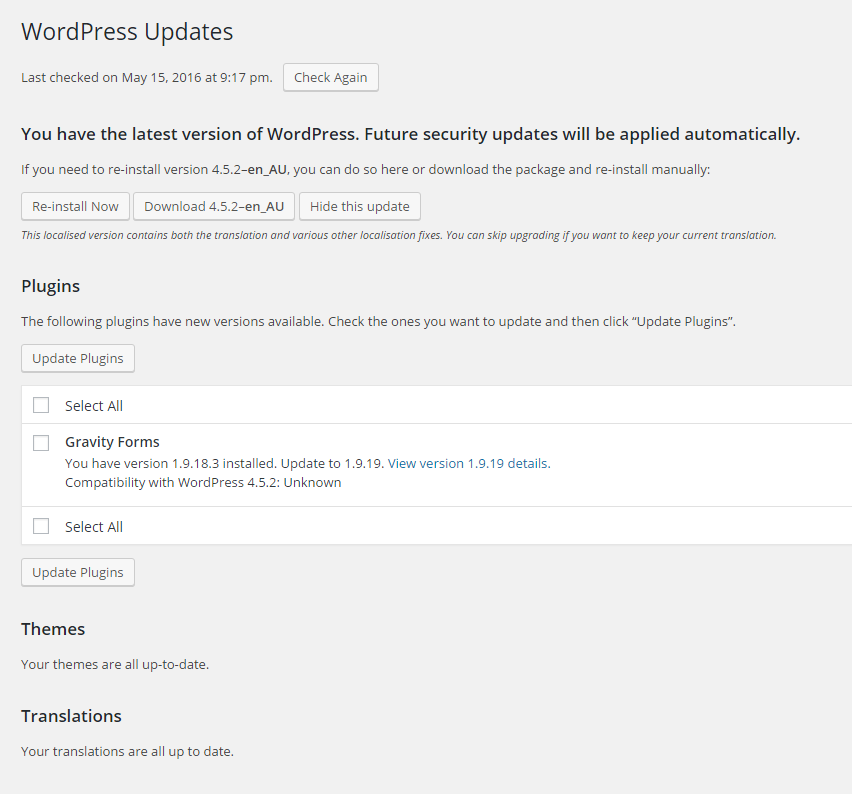
In the case above, there is an update to the plugin “Gravity Forms”.
I select the box to the left of Gravity Forms, and click Update Plugins.
The following screen will load:
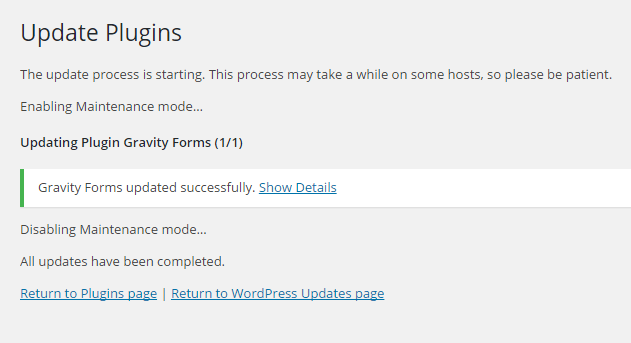
If there is still an indication that further updates are available, click “Return to WordPress Updates page”, and follow the prompts to update any further themes, plugins, or updates to the WordPress core software.
Chapter 5: what to do when something goes wrong
If you find that during or after an update, you can’t can’t regain access to the WordPress dashboard, normally you’ll receive a 500 internal server error message.
If this is the case;
- open a new tab in your web browser (Windows: CTRL + T, Mac: CMD + T), and open and login to your web hosting control panel.
- Inside your control panel, find the File Manager.
- Inside File Manager, find /public_html/ (for cPanel) or httpdocs/ (for Plesk).
- Inside this file, find wp-config.php, and right-click > Edit (for cPanel), or click it (Plesk) to edit the file.
- Find the line:
define('WP_DEBUG', false);
and replace it with
define('WP_DEBUG', true);
define('WP_DEBUG_LOG', true);
define('WP_DEBUG_DISPLAY', true); - Now save the file.
- Now reload your WordPress dashboard or home page - whichever one produced the 500 internal server error. There should be a detailed error message displayed now.
- Copy this error message and paste it into Google and search.
- The search results will hopefully describe the solution you can follow.
Chapter 6: disaster recovery
If you find you cannot fix the error yourself, you have some options:
- Post a question to the WordPress support forums: https://wordpress.org/support/forums/
- Send a support request to your web hosting provider.
- If your web hosting provider cannot help, your last bet is to upload your backup to your web hosting space, and ask your web hosting provider to restore the backup for you.
- When you upload the backup, don’t upload it to /public_html/ or /httpdocs/, upload it to a folder outside of those folders, like Backup, below:
If you'd prefer not to worry about the work required to maintain your website, let us take care of your website for you.