
Geo targeting in Google Ads controls which countries, cities, postal codes, radii, or location groups can see your ads. For a local business, the single most important decision isn’t the target itself. It’s the match type: choose Presence if you need people physically inside your service area (plumbers, dentists, restaurants), and Presence or Interest only when you want the wider net of people planning a trip or researching the area.
Google’s own location targeting documentation confirms you can target by country, region, city, postal code, radius, or location group, and each has different behavior around minimum size and privacy rules. Skip Presence entirely and the default setting will show your ads to people who merely searched about your city, not people standing in it. That’s how a fencing company in Perth ends up paying for clicks from someone in Sydney planning a visit.
- Presence: only people physically in or regularly in your target area
- Presence or Interest: people in the area, plus anyone showing interest in it
- Radius targeting: minimum 1 kilometer, subject to privacy thresholds
A related case: after a focused local optimization program that included tighter geo settings and localized landing pages, Webby helped one client see a 10x jump in Google visibility.
Key Takeaways
Correct geo targeting depends on matching the Presence or Presence-or-Interest setting to your business model, then refining with radius, exclusions, and localized landing pages.
| Point | Details |
|---|---|
| Choose the right match type | Use Presence for in-person services; use Presence or Interest for travel or research-driven searches. |
| Respect the radius floor | Radius targets below 1 kilometer may not serve consistently due to privacy thresholds. |
| Exclusions override inclusions | Check both campaign and account-level exclusions when a targeted area isn’t showing impressions. |
| Localize the landing page | Ad copy and destination pages matched to the targeted area convert better than generic pages. |
| Get expert setup support | Webby Website Optimisation audits and manages local Google Ads campaigns, including landing-page builds. |
Table of Contents
- How Does Google Ads Match Users to Locations?
- What Types of Location Targets Can You Choose From?
- How Do You Add and Manage Location Targets in Google Ads?
- What Do the Advanced Location Settings Actually Control?
- How Do You Avoid Wasting Local Ad Spend?
- Why Are My Location Targeting Results Off?
- What Actually Happens When You Get Geo Targeting Right?
- What Most Advertisers Get Wrong About Geo Targeting
- Get Expert Help Setting Up Your Local Campaigns
- Sources
How Does Google Ads Match Users to Locations?
Google doesn’t rely on one signal to decide where someone “is.” It blends several: the device’s IP address, GPS data on mobile, past physical locations, and the location terms typed into a search query. That combination is why someone traveling can still see an ad meant for local residents. If their device pings a nearby cell tower or they search “plumber near [your suburb],” Google may count that as a valid match even though they don’t live there.
This is where the PRESENCE_OR_INTEREST versus PRESENCE distinction actually matters in practice. PRESENCE_OR_INTEREST is the default, and it’s built for reach: it captures people in the area and people who are merely interested in it, which works well for travel, real estate research, or seasonal event promotion. PRESENCE strips out the “interested” group entirely and shows ads only to people Google believes are physically there.
- IP address and device signals estimate a user’s physical location
- Search terms containing place names can trigger a match even from far away
- Past location history feeds into Google’s confidence about where someone regularly is
Small radius targets carry their own quirk. Google enforces a minimum radius of 1 kilometer, and even at that size, a target with too few users nearby may serve intermittently rather than consistently. This isn’t a bug. It’s a privacy threshold designed to stop advertisers from inferring individual movements in sparsely populated areas.
Pro Tip: If your radius campaign shows almost no impressions in a low-density suburb, don’t assume your bid is too low. Check whether the area simply doesn’t meet the minimum audience size Google requires before it will serve ads there.
What Types of Location Targets Can You Choose From?
Google Ads offers five practical levels of granularity, and picking the wrong one is one of the most common reasons local budgets get wasted on the wrong audience.
- Country or region. Best for businesses with multi-state or national reach, like an e-commerce brand shipping across the country. Too broad for a single storefront.
- City or postal code. The workhorse for local service businesses. A postal code target lets an electrician or hairdresser cover exactly the suburbs they service, without spillover into neighborhoods they can’t reach.
- Radius or proximity targeting. Ideal for delivery businesses or single-location shops where distance from a point matters more than administrative boundaries. Remember the 1 kilometer floor. Below that, Google may refuse to serve the target consistently.
- Location groups. These bundle your own business locations, tiered demographics, or points of interest into one target, useful for chains with several branches that all need the same campaign logic.
- Places of interest. Targets people near landmarks, shopping centers, or transit hubs, useful for foot-traffic-dependent businesses like cafes near a train station.
Most local advertisers end up combining city or postal code targeting with a radius layer around their physical premises, then refine with exclusions once they see where the wasted spend is coming from.
How Do You Add and Manage Location Targets in Google Ads?
The path is the same whether you’re setting up a new campaign or editing an existing one: Campaigns → Settings → Locations. From there, the basic search box lets you type a city, region, or postal code directly. Click “Advanced search” and you unlock radius targeting and bulk upload tools, which is where most of the real configuration work happens.
- Open the campaign, go to Settings, and expand the Locations section.
- Use “Enter another location” for a single city, region, or postal code, or switch to Advanced Search for radius and bulk options.
- For radius targeting, drop a pin or enter an address, then set the distance. Anything below 1 kilometer won’t be accepted.
- For bulk targeting, upload a CSV, importing up to 1,000 locations in a single pass, which is standard practice for agencies running many local campaigns at once.
- Add exclusions in the same panel using “Exclude” instead of “Target.” Exclusions always override inclusions, so if a suburb is both targeted and excluded, it gets excluded.
- Before saving, review the location summary panel. Google shows a running list of everything included and excluded, which is the fastest way to catch a mistake before it costs you money.
- Save, then check the campaign’s diagnostics page over the next 24 to 48 hours to confirm impressions are landing where expected.
Pro Tip: When uploading a bulk location list, filter by country code first. Two cities can share a name across different countries, and a mismatched entry can quietly redirect part of your budget somewhere you never intended.
What Do the Advanced Location Settings Actually Control?
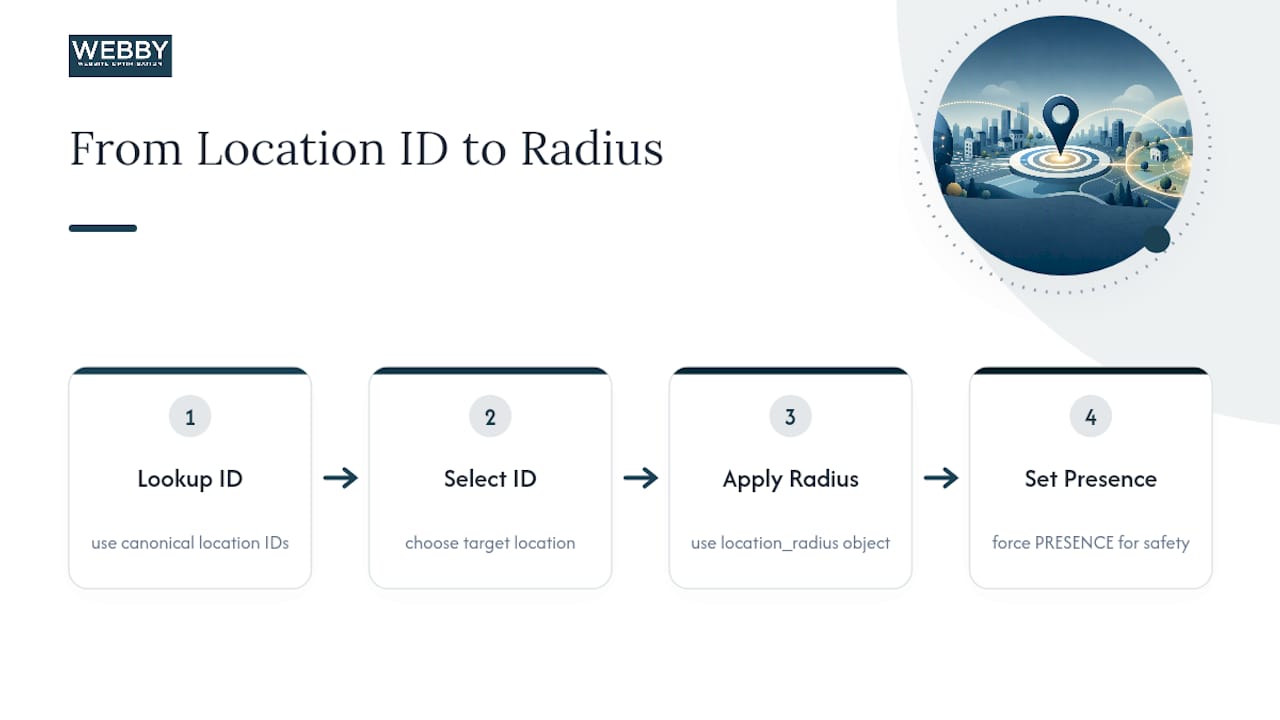
Underneath the simple Presence/Interest toggle in the interface sits a more precise structure that matters if you manage several campaigns or work with a developer on bulk automation. Google’s location logic runs on a field called GeoTargetTypeSetting, which has two separate parameters: one for inclusions and one for exclusions.
The positive_geo_target_type defaults to PRESENCE_OR_INTEREST, matching what most advertisers see in the standard interface. The negative_geo_target_type, by contrast, defaults to PRESENCE, meaning exclusions only block people Google believes are physically in that excluded area, not people merely searching about it. That asymmetry catches people off guard: you can exclude a region for inclusion purposes but still see a trickle of interest-based traffic bleed through if you haven’t checked both settings.
Excluded locations always take precedence over included ones. A common and costly mistake is excluding a parent region while trying to target a smaller area inside it, which silently blocks the very audience you meant to reach.
For sensitive verticals, in-home services, or anything where showing up to the wrong physical address creates real problems, force PRESENCE on both sides rather than trusting the defaults. Bulk exclusion workflows carry a documented limit, and advertisers can exclude up to 1,000 locations via CSV upload, the same ceiling as bulk inclusions.
Developers working programmatically should look up canonical location IDs through GeoTargetConstantService.SuggestGeoTargetConstants, and use the ProximityInfo object for radius targets rather than hardcoding coordinates by hand.
How Do You Avoid Wasting Local Ad Spend?
Start smaller than feels comfortable. A tight radius around your storefront, or two or three postal codes you know convert, gives you clean data faster than a sprawling regional campaign. Once you have two or three weeks of performance, expand outward based on where the actual conversions came from, not where you assumed they’d come from.
- Use Presence for any business where the customer must physically visit or be visited, plumbers, clinics, restaurants, salons.
- Use Presence or Interest for travel, real estate, events, or anything where a person planning ahead is still a valid lead.
- Localize your ad copy and landing page to the exact suburb or region you’re targeting with practical tips from the Google Ads for Local Business guide. Generic copy converts worse than copy naming the actual neighborhood, and local intent phrases like “near me” or specific suburb names tend to lift both relevance and conversion rate.
- Review the location performance report weekly during the first month of any new geo campaign.
- Apply negative locations the moment you spot a suburb or region generating clicks with no conversions.
- Use location bid adjustments to push more budget toward postal codes with strong return and pull back from ones that only generate impressions.
Pro Tip: Set a calendar reminder to check your location report every Monday for the first month. Wasted geo spend rarely shows up as one big red flag. It shows up as a slow, unglamorous leak across three or four postal codes you never bothered to look at closely.
Why Are My Location Targeting Results Off?
When impressions look wrong, whether that’s too few, too many, or from the wrong area entirely, work through this order rather than guessing.
- Check the geo target type first. Confirm whether the campaign is set to Presence or Presence or Interest. This single toggle explains more targeting surprises than any other setting.
- Verify the radius meets the minimum. Anything close to the 1 kilometer floor may be running into privacy thresholds that limit how consistently it serves.
- Look for exclusion conflicts. Check both campaign-level and account-level exclusions. A region excluded upstream will silently override a target you’re trying to include downstream.
- Pull the location report and cross-check against diagnostics. Google Ads’ location report, segmented by the geographic location where the ad served, will show you exactly where impressions landed, which is the fastest way to confirm whether the setting is working as intended or something is misconfigured.
Most targeting problems trace back to one of these four causes. Working through them in order saves time compared to rebuilding a campaign from scratch.
What Actually Happens When You Get Geo Targeting Right?
A focused local optimization program built around correct geo settings produced a measurable jump for one Webby client: a 10x increase in Google visibility for Geographe Canvas.
The work behind that number wasn’t exotic. It came down to three specific moves:
- Target consolidation. Instead of running scattered, overlapping location targets, the campaign was rebuilt around the specific areas the business actually served, cutting spend that had been leaking to adjacent regions.
- Switching to Presence. The business needed customers who could physically visit or be visited, so broad interest-based reach was traded for tighter physical-presence matching.
- Localized landing pages. Ad destinations were rewritten to match the specific area being targeted, rather than sending every click to one generic homepage.
Any local business running the same three changes, consolidate targets, pick the right match type, localize the landing page, should expect to see a similar directional shift, even if the exact multiple varies by market and competition.
What Most Advertisers Get Wrong About Geo Targeting
The conventional advice treats geo targeting as a “set it once” task, something you configure in the first week of a campaign and never revisit. That’s backwards. The location report is one of the most underused diagnostic tools in the entire platform, and most small business accounts I’ve reviewed haven’t touched it in months.
The bigger issue is the default. PRESENCE_OR_INTEREST sounds like the safer, broader choice, and for a lot of businesses it becomes an expensive default nobody questions. If you sell an in-person service, that setting is quietly funding clicks from people who will never walk through your door. Fixing it takes thirty seconds in the campaign settings and often cuts wasted spend more than any bid strategy change ever could.
What the reader should prioritize first isn’t a fancy radius calculation or a clever exclusion list. It’s confirming the match type actually fits the business model. Everything else, radius size, bulk imports, bid adjustments, is optimization on top of a foundation that either works or doesn’t.
Get Expert Help Setting Up Your Local Campaigns
Running through campaign settings, radius minimums, and exclusion priorities on your own is doable, but it eats hours most small business owners don’t have. Webby Website Optimisation manages Google Ads campaigns for local service businesses directly, handling the geo target configuration, bid adjustments, and location reporting so you’re not the one staring at a diagnostics page at 9 p.m.

A typical engagement starts with an audit of your existing campaign structure, spots quick wins like fixing a mismatched Presence setting or catching an exclusion conflict, then moves into optional ongoing management if you want someone watching the location report every week instead of once a quarter. Webby also builds the localized landing pages that make geo-targeted ads actually convert, since a perfectly targeted ad sending traffic to a generic homepage still underperforms. If your ads need a destination page built around the specific area you’re targeting, Webby’s website design and development service covers that build from the ground up. Reach out for a campaign audit and find out exactly where your local budget is leaking.
Sources
- Target ads to geographic locations – Google Ads Help
- Location targeting – Google Ads API documentation